|
|
Brake Installation
Recently I purchased a new Titan truck to replace my ageing Dodge Dakota. It wasn't to long before I started having a problem with my brakes that I had experienced with my Dodge. "Brake Judder". You know the problem. Every time you step hard on the brakes the whole vehicle begins to shake.
Thinking back on it for a minute, I remembered contacting a company in California who had a different idea on extending brakes life. I had put a set of their brakes on my Dakota and they were still on the vehicle when I sold it!
The only problem, remembering their name let alone if they were still in business today. Fortunately, one day, I was going thought one of the new Titan forums when I ran across a thread talking about brake problems and there they were, Applied Rotor Technology (ART).
What luck. The next day I picked up the phone and got in touch with them again. Speaking with one of the owners, I found out that the company had changed hands. It turned out years earlier, when I was in touch with ART for brakes for my Dakota, I had been speaking to the new owner's nephew. Steve and his partner, Pad, told me they can build brakes for any disc brake equipped vehicle.
Naturally, I asked about brakes for the Titans. Steve told me they were trying to help Titan and Armada owners over come these brake problems but, many owners were just taking the simple route, take it back to the dealer. Only problem is, after a few thousand miles, the judder is back again. Sure, I know, take it back to the dealer. Right? They'll fix it under warranty but, who wants to take a day off of work and spend it at the dealer only to have the problem re-surface again after a few thousand miles?
During our conversation, Steve told me of an owner, in Riverside California, who's dealer had informed him after six brake warranty claims, the dealer would not cover it anymore. This owner had had six set of brakes installed in just nine months! Wow! I'm glad I not him...
Well to make a long story short, ART sent me one of their Titan front rotor kits. I decided to document the project after ART told me they where always looking for customer projects for their website. So, I hope you'll enjoy my installation outline as much as I enjoyed doing it.
Dave.
Denver, Colorado
Note: Although this job doesn't take long to perform, I do recommend using a solid and level area of your garage for this project. I started by parking my Titan in the center of the area I cleared. This way, there is enough room to move from either side to finish without having to down-jack the truck before finishing the project. Make sure the ignition is OFF and your wheel chocks are nearby too. Safety first.
1. I started by using a barker-bar to loosen the Titan's 21mm (13/16”) Lug-nuts on both front wheels before placing the truck on my jack-stands. If you do this step first, you will not have to have someone standing on the brake peddle while you fight to loosen them on the stands.
2. Next, using my hydraulic jack, I looked for and found a solid location in the center for the cross member and lifted the front of the truck high enough place my jack-stands at either end of the cross member.
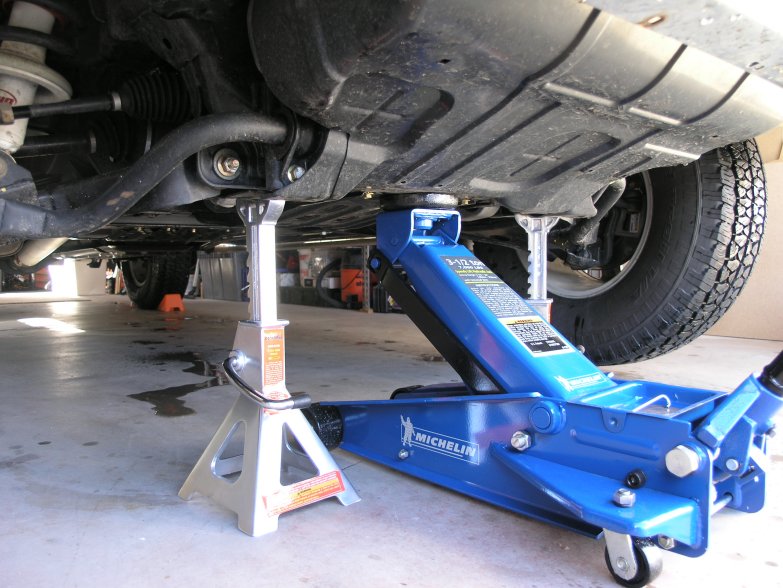 |
| Safety first. Use good quality jack-stands and wheel chocks to prevent the vehicle from moving. |
3. Now, remove the six (6) 21mm lug nuts from each of your trucks wheels, place them in a safe place and remove the wheels.
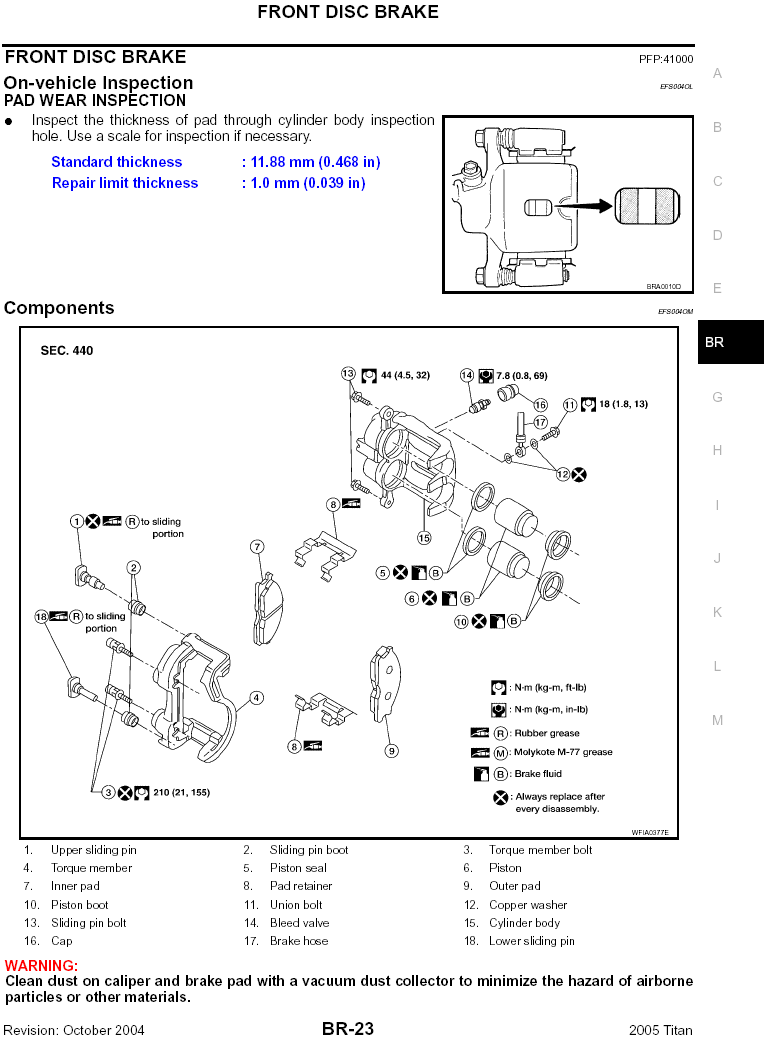
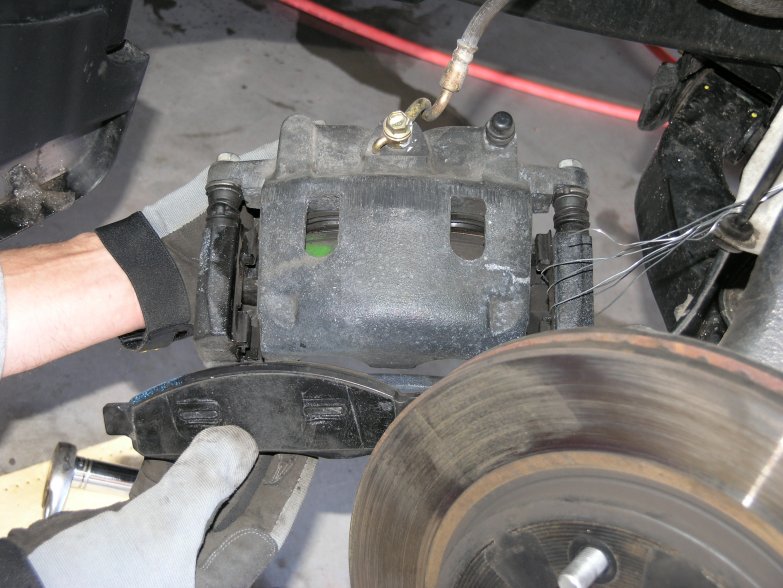
4. In this step I'll remove the brakes calipers but, before I do so, I 'm going to place a small length of wire nearby so I can rig them out of the way before removing them. If you don't use this wire or some other item, like a tie-wrap, you'll have your calipers hanging by the brake lines and I don't recommend this. Now, remove the two (2) 21mm “Torque Member Bolts”. (noted as item #3 on Nissan's illustration notes).
Also, for your information, when I removed these bolts, they were tight all the way to removal. This is common.
After removing the bolts, secure the caliper assembly to a convenient spot, on the suspension, with that length of wire so the rubber brake line is not supporting the weight of the assembly. You don't want to risk damaging your brake lines.
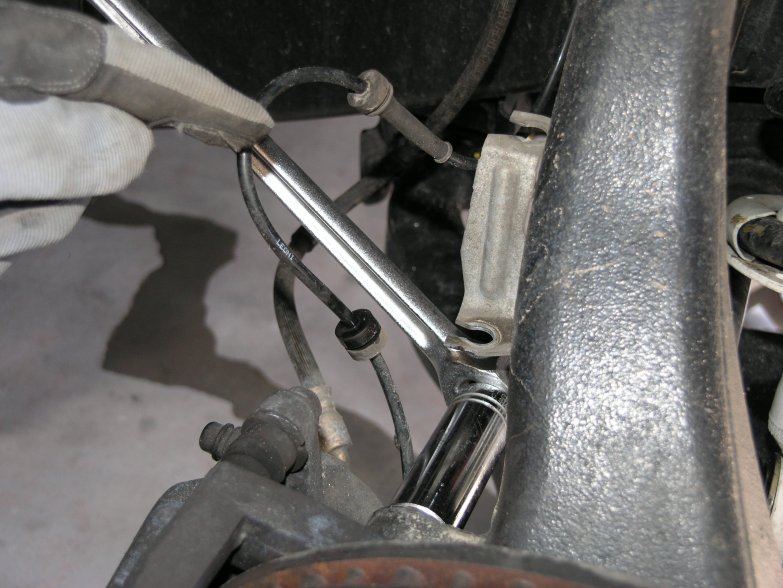 |
| Using a 21mm socket, remove the two torque member bolts securing the caliper assembly to the suspension member. |
Note: Nissan says you need to replace these bolts with new ones. P/N 41005-7S000. My dealer charged me $9.80 each and there are (2) of them used on each caliper mount. If you decide to reused the old plots, Nissan's notes indicate you can do so after a good cleaning and application of loctite before reuse.
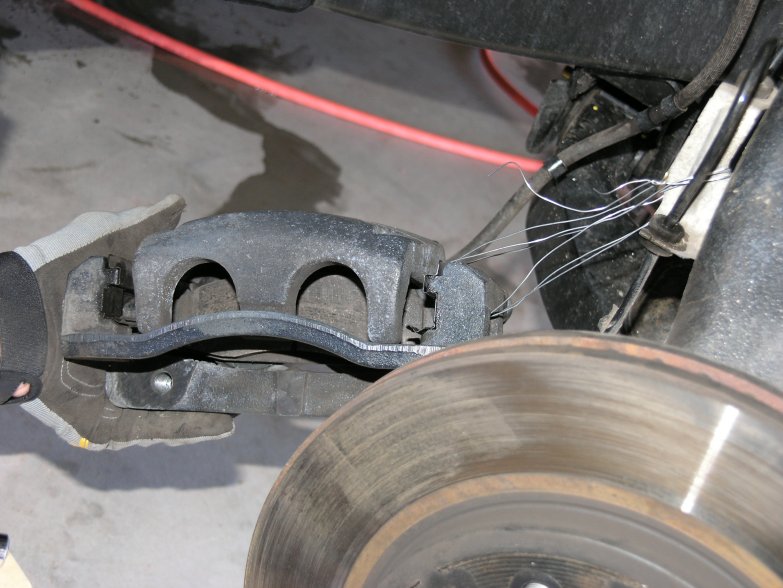 |
| Rig the caliper assembly from the suspension with a length of wire. |
5. Once the caliper assembly has been removed and suspended, remove the clips securing the pads and removed the stock brake pads from the calipers.
 |
| Stock front brake pads removed. |
6. Before taking the time to clean the suspension area, I planned to apply "Anti-Squeak" compound to the back of each of the new pads supplied with the kit. This is a step worth doing now and taking the time to do it correctly. Since brake squeak is not only annoying, it really annoying if you have to take the system apart again should your truck develop brake squeak. Like my grandfather use to tell me "...There's never enough time to do things right the first time but, there's always enough time to do things again, and again, and again."
Following the directions of the product you select, apply anti-squeak compound to the backside of each of the kit brake pads. Following the manufactures instructions to give the product time to dry before attempting to install the pads.
 |
| Brake pads. On the rear of each, a small amount of Anti-Squeak compound applied to back side of pads. |
7. Now is a good time to clean all of the surfaces while the anti-squeak is drying (especially where the pistons contact the back of the pads). Also, clean the spindle-mating surface where the rotor disc contacts the spindle. Do this to both the left and right hand sides of the vehicle before moving forward.
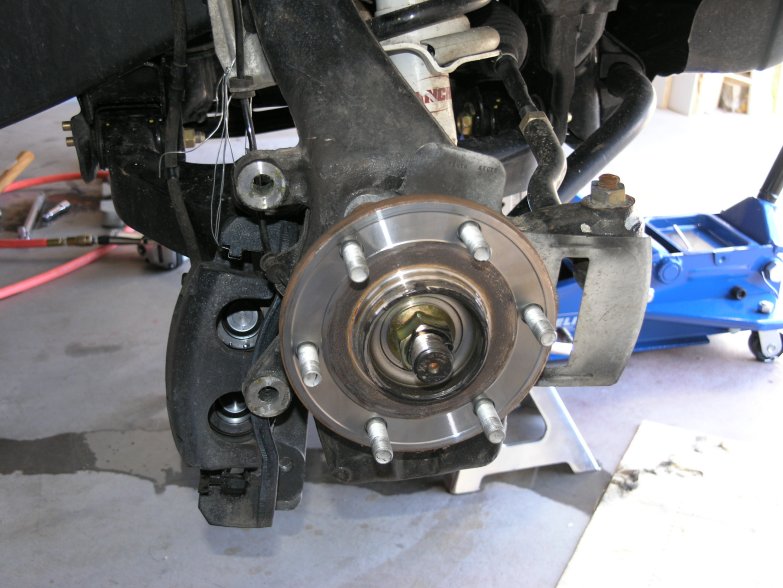 |
| Cleaned suspension and spindle. |
8. Install the new “inboard” brake pad into the caliper. you'll need to push the piston back some to provide enought room for the new pads supplied with the kit. If you have a problem depressing the piston, you can use a C-Clamp (or equivalent) very carefully to help in process. While doing this, keep on eye on the brake master cylinder. This process can displace some fluid.
Also, I applied some Molykote M-77 grease where the tabs on the new pads contacts the retainer clips. Now, install the second brake pad and apply a little grease at this clip too. The caliper is now complete and ready to re-install.
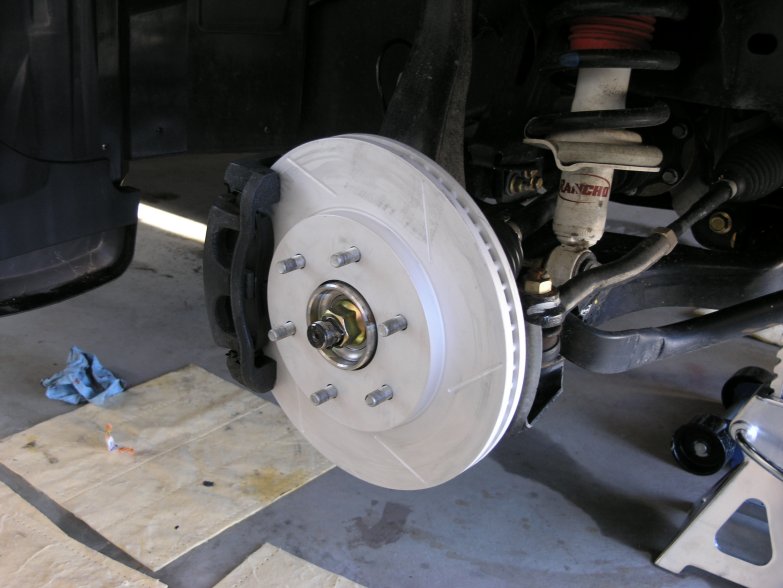
9. Noting the direction of the gas-ports on the new rotor discs. Trial fit the discs before re-installing the calipers. Install the new ART rotor disc onto the spindle by sliding it over the lugs.
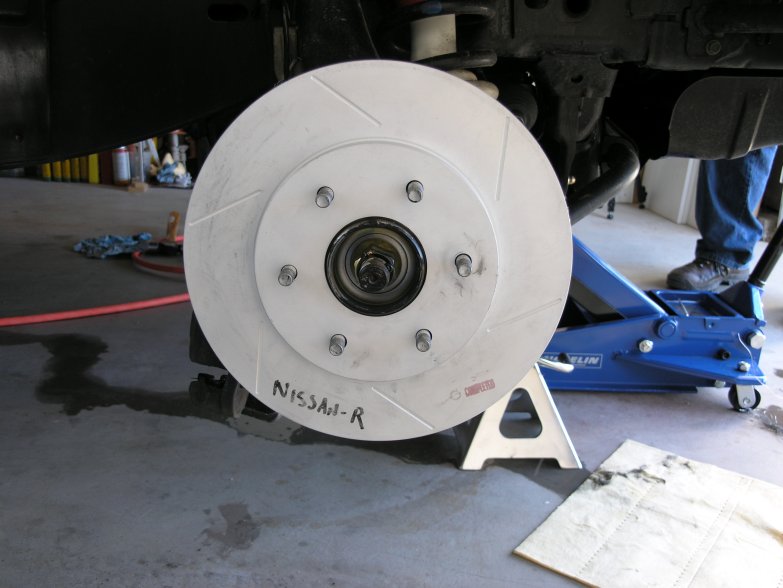 |
| Applied Rotor Technology Cyro-treated rotors installed. Right hand disc. Note direction of "Gas-Ports" |
10. Next, using (2) new “Torque Member” 21mm bolts. Nissan P/N 41005-7S000. Re-install the completed calipers onto each of the new rotor discs.Torque the bolts to 155 ft. lbs.
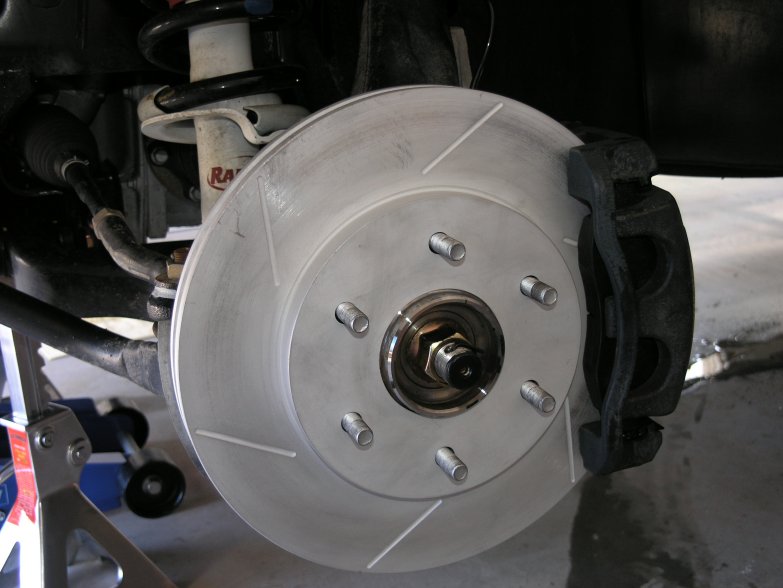 |
 |
| Complete. Left and Right | |
11. Ensure all parts are clean before re-install the wheels. Torque the wheel lug nuts to 90 ft. lbs.
12. Finished. Now, raise the vehicle just off of the jacks and remove them. Lower the vehicle and remove the wheel chocks.
13. Time to bed-in the new brakes.
Gas-port slotting offers the following advantages:
- Maximizes ventilation by increasing the rotor's ability to dissipate heat, resulting in cooler operating temperatures.
- Provides multiple pathways whereby the boundary layer gases that are being developed as a result of braking, have the ability to escape, thus allowing a better “bite” on the disc’s friction surfaces.
- Lightens the rotor, thereby decreasing its rotational inertia, which aids in stopping.
Warning: This next step is CRITICAL to properly “break-in” your new pads and rotors. This is an excerpt from the ART Installation Notes.
Pad and Rotor Bedding Procedure for Street Performance Pads
After installing rotors and pads on a vehicle, a bedding or bed-in procedure must be performed on the brake system.
There are two objectives for bedding-in performance brakes. First, heating up the brake rotors and pads in a recommended manner, so as to promote the transfer of an even or uniform layer of pad material onto the new rotor discs; and the maturing the pad material, so that the resins used to bind and form them during manufacturing are ‘cooked-off’ the pads.
The first objective is achieved by performing a series of stops, so that the brake rotor discs and pads are heated steadily to a temperature that promotes the transfer of pad material onto the brake rotor’s friction surfaces.
It should be noted here that there is one pitfall in this process, which must be avoided. The rotor and, therefore, the vehicle should not be brought to a complete stop, with the brakes still applied, as this risks the non-uniform transfer of pad material onto the friction surfaces. This uneven transfer is sometimes known as “pad-imprinting”.
The second objective is achieved by performing another set of braking events whereby the bonding resins are “cooked-off” relatively slowly to avoid both fade and uneven deposits or thickness variations (TV) onto the rotor discs.
The bed-in process is not complete until both sets of stops have been performed.
Plan where and when you do this procedure with care and concern for others’ safety and yourself. After the last stop, the system should be allowed to cool to ambient temperature.
If you come to a complete stop before the break-in process is completed there is the chance for non-uniform pad material transfer or pad imprinting to take place and the results will be what the whole process is trying to avoid.
1. Perform five partial braking actions, from 55-60mph down to 10mph. Each event should achieve a moderate-to-high deceleration.
In terms of stopping force or severity to use depends on the vehicle. If the vehicle is equipped with an ABS system and the stopping forces exceeds approximately 0.9G’s, the ABS system will typically intervene.
What you want to accomplish is stopping at a rate below the ABS system triggering or around 0.7G’s and these events should be made one after the other, without allowing the brakes to cool other than under normal acceleration in between each stop. Remember, this is not a race so, take your time.
Depending on the composition of the pad material, the brake friction will seem to gain slightly in performance, and will then lose or fade somewhat by around the fifth stop.
You may begin to smell the pads at around the 4th to 5th stop. This odor is green fade, and is characteristic of immature or ‘green’ pads, in which the resins still need to be “cooked-off” the pad material. This odor should diminish before the last stop.
These first sets of stops, in the bed-in process, are only complete when all stops have been performed - not before.
2. After the first bed-in procedure, allow the brakes to cool by driving the vehicle at a safe speed for the conditions, without bringing the vehicle to a complete stop.
After cooling, a second set of partial braking events should be performed, followed by another cooling exercise. In some situations, a third set is beneficial, but two are normally sufficient. Again, these final sets of braking events are used to mature the pads.
Close inspection of properly bedded pads will show an area about 1/8" deep of a powdery gray area becoming visible on the edges of the pad’s friction face. This is where the paint and resins are cooking-off.
Depending on the pad compound, easy use of the brakes for an extended period of time may also lead to the removal of the bedded transfer layers on the discs by the ordinary abrasive action of the pads. Exercising the brake systems with a partial re-bedding will prevent uneven pick-up when a vehicle has seen easy braking use for a while.
After the “break-in” is complete, you should verify that the wheel lug nuts are still torqued to 90 ft. lbs.
Nissan’s reference data.